
SOLIDWORKS PDM
Overview
Maximizing Data Efficiency with SOLIDWORKS PDM
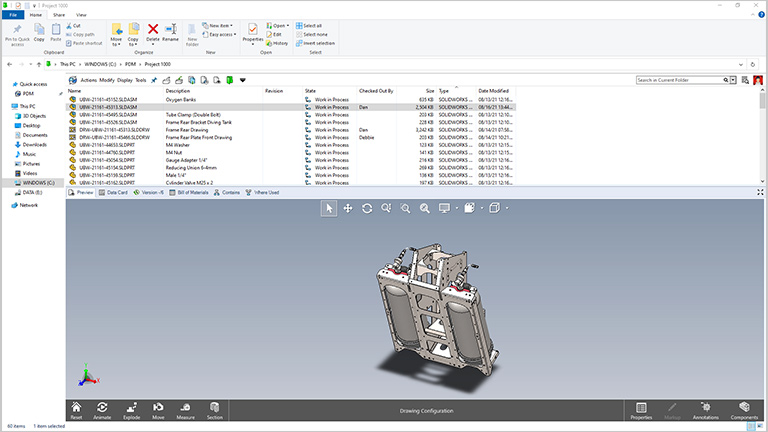
SOLIDWORKS PDM provides a secure, intuitive environment for engineering teams to manage, search, and version-control CAD files directly within Windows Explorer. By centralizing design data, it ensures that technical information is organized and accessible, allowing engineers to collaborate effectively and track changes throughout the design process without disrupting their existing workflows.
Moving beyond file management, PLM (Product Lifecycle Management) integrates this data with broader business processes across the entire organization. While PDM focuses on engineering files, PLM governs the complete product journey—from initial concept and procurement to manufacturing and end-of-life—ensuring alignment between departments like quality, project management, and service.
Core Functionalities
Centralized Data
Store and control all engineering design data in one place.Facilitates easy access, improved control, and eliminates data duplication.
Team Collaboration
Facilitates smooth coordination between design, engineering, and management teams.Improves productivity by ensuring all teams work with updated data.
Change Control
Manages engineering change requests and approvals effectively.Reduces discrepancies by maintaining organized ECN/ECO procedures.
Knowledge Reuse
Facilitates rapid reuse of existing product designs and data.Saves time and ensures consistency across projects.
Workflow Automation
Automates approval and document routing procedures.Accelerates processes with minimal human intervention.
Multi-Location Access
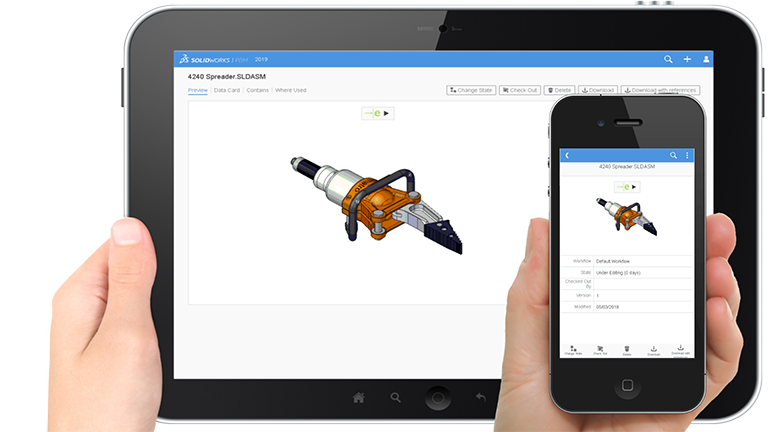
Facilitates data sharing across multiple offices and teams.File replication enables fast and secure access to data anywhere.
System Integration
Integrates seamlessly with ERP and MRP systems.Synchronizes design data with manufacturing and business processes.
Version Tracking
Tracks all changes and approvals to design files.Ensures traceability with accurate audit trails.
Key Features & Benefits
- Engineering Design data created by users in Organizations have knowledge embedded in the data created.
- Storing, locating, re-using and updating of Engineering Data to ensure organizations benefit from the knowledge created and updated.
- Addresses Collaborative Engineering, Engineering Change Management and Product Knowledge Re-use.
- Easy to implement and use, entirely integrated within Windows Explorer.
- Users perform all functions through Windows Explorer or CAD integrations.
- Secure access with automated approval process workflow (ECN/ECO).
- Full document preview with audit trails for regulatory compliance.
- Engineering Design data created by users in Organizations have knowledge embedded in the data created.
- Storing, locating, re-using and updating of Engineering Data across departments and locations.
- Addresses Collaborative Engineering, Engineering Change Management and Product Knowledge Re-use.
- Provides scalable, secure access for large design teams.
- Enables companies to manage data at multiple locations with automatic file replication at each site (Distributed Design).
- Enables ERP / MRP connectivity for enterprise-level integration.
- Advanced automated workflow with complete audit trail and regulatory compliance support.
| Features |
|---|
|
SOLIDWORKS 3D CAD |
|
Part and Assembly Modelling |
|
Design Reuse and Automation |
|
Interference Check |
|
Collaborate and Share CAD Data |
|
Advanced CAD File Import/Export – 3D Interconnect |
|
First Pass Analysis Tools – Simulation Xpress |
|
Productivity Tools |
|
SOLIDWORKS CAM Standard* |
|
Design for Manufacturing |
|
Xtended Reality (XR) Exporter |
|
SOLIDWORKS Visualize Standard* |
|
CAD Libraries (SOLIDWORKS Toolbox) |
|
Design for Cost & Estimation (SOLIDWORKS Costing) |
|
ECAD/MCAD Collaboration (CircuitWorks™) |
|
CAD Standards Checking |
|
Automated Tolerance Stack-Up Analysis (TolAnalyst) |
|
SOLIDWORKS File Management |
|
Reverse Engineering (ScanTo3D) |
|
eDrawings® Professional |
|
Time – Based Motion Analysis |
|
Linear Static Analysis for Part and Assemblies |
|
Routing of Pipes and Tubes |
|
Routing of Rectangular and Other Sections |
|
Advanced Surface Flattening |
|
Assembly Level Cost Roll Up |
|
Electrical Routing |
| Standard |
|---|
|
|
|
|
|
|
|
|
|
|
|
|
|
|
|
|
|
|
|
|
|
|
|
|
|
|
|
|
|
|
|
|
|
|
|
|
|
|
|
|
|
|
|
|
|
|
|
|
|
|
|
|
|
|
| Professional |
|---|
|
|
|
|
|
|
|
|
|
|
|
|
|
|
|
|
|
|
|
|
|
|
|
|
|
|
|
|
|
|
|
|
|
|
|
|
|
|
|
|
|
|
|
|
|
|
|
|
|
|
|
|
|
|
| Premium |
|---|
|
|
|
|
|
|
|
|
|
|
|
|
|
|
|
|
|
|
|
|
|
|
|
|
|
|
|
|
|
|
|
|
|
|
|
|
|
|
|
|
|
|
|
|
|
|
|
|
|
|
|
|
|
|
Choosing the right SOLIDWORKS package depends on your design needs, team size, and project complexity.
From Standard to Premium, we help you identify the ideal solution that maximizes performance while staying within budget.
-
Want to buy
SOLIDWORKS PDM?
| Features |
|---|
|
SOLIDWORKS 3D CAD |
|
Part and Assembly Modelling |
|
Design Reuse and Automation |
|
Interference Check |
|
Collaborate and Share CAD Data |
|
Advanced CAD File Import/Export – 3D Interconnect |
|
First Pass Analysis Tools – Simulation Xpress |
|
Productivity Tools |
|
SOLIDWORKS CAM Standard* |
|
Design for Manufacturing |
|
Xtended Reality (XR) Exporter |
|
SOLIDWORKS Visualize Standard* |
|
CAD Libraries (SOLIDWORKS Toolbox) |
|
Design for Cost & Estimation (SOLIDWORKS Costing) |
|
ECAD/MCAD Collaboration (CircuitWorks™) |
|
CAD Standards Checking |
|
Automated Tolerance Stack-Up Analysis (TolAnalyst) |
|
SOLIDWORKS File Management |
|
Reverse Engineering (ScanTo3D) |
|
eDrawings® Professional |
|
Time – Based Motion Analysis |
|
Linear Static Analysis for Part and Assemblies |
|
Routing of Pipes and Tubes |
|
Routing of Rectangular and Other Sections |
|
Advanced Surface Flattening |
|
Assembly Level Cost Roll Up |
|
Electrical Routing |
| Standard |
|---|
|
|
|
|
|
|
|
|
|
|
|
|
|
|
|
|
|
|
|
|
|
|
|
|
|
|
|
|
|
|
|
|
|
|
|
|
|
|
|
|
|
|
|
|
|
|
|
|
|
|
|
|
|
|
| Professional |
|---|
|
|
|
|
|
|
|
|
|
|
|
|
|
|
|
|
|
|
|
|
|
|
|
|
|
|
|
|
|
|
|
|
|
|
|
|
|
|
|
|
|
|
|
|
|
|
|
|
|
|
|
|
|
|
| Premium |
|---|
|
|
|
|
|
|
|
|
|
|
|
|
|
|
|
|
|
|
|
|
|
|
|
|
|
|
|
|
|
|
|
|
|
|
|
|
|
|
|
|
|
|
|
|
|
|
|
|
|
|
|
|
|
|
Services & Training
We help you solve engineering challenges, together.
Whether you’re looking to outsource expertise or upskill your team, we work as a seamless extension of your organization to deliver measurable results.
Engineering Services
We help turn complex ideas into manufacturable products through robust design, analysis, and engineering support—focused on accuracy, efficiency, and real-world performance.
SOLIDWORKS Training
Develop practical SOLIDWORKS skills with flexible training programs designed for engineers, designers, and teams—covering essentials through advanced workflows.
FAQ
The blue folder color indicates PDM is in Work Off-line mode. There are times when working with SOLIDWORKS PDM when users will need to work on files in the vault while not connected to the network, e.g., working remotely, visiting a customer, or maybe the network or PDM is unavailable for maintenance reasons.
1.Check out and cache latest versions of files locally (only files cached locally will be available).
2.Switch to Work Off-line mode from Tools Menu and disconnect from the network.
3.Access locally cached files while working off-line.
4.Connect to the network and switch to Work On-line mode via Tools Menu.
Check in files which were changed.
When a file is checked out from the vault; the database will store information about which user, client computer and vault view that file is checked out on. When the file is checked back in, the same information is matched against the checkout information to ensure the file is being checked in from the same client view and computer. If an attempt is made to check in a file that was checked out from a different file vault view, you’ll be greeted with a warning showing that the information doesn’t match; ‘The file is checked out on another computer‘ blocking the check-in.
SOLIDWORKS PDM Search Local Files’ command, This new command can be accessed through the right-click shortcut menu in the Vault View. This command can be used to search for any files that exist in the local vault view that have NOT yet been added to the vault (so they are not yet in Private State)
1.Select the file which needs to be attached as reference to the Parent File and copy it.
2.Select the Parent File and check-out.
3.Right Click the parent file and select Paste as Reference.
4.Check-In the Parent File and select Contains Tab to view the manual reference created.
1.In the world of SOLIDWORKS PDM, nothing is truly gone until it’s DESTROYED.
2.If you mistakenly delete a file, SOLIDWORKS PDM has your back and using the recycle bin we can recover a deleted file.
3.To restore a deleted file, requires the folder permission: Recover files from recycle bin
4.The SOLIDWORKS PDM recycle bin can be accessed via the folder properties
5.Select the Deleted Items tab and enable the Include items in sub-folders checkbox
Right the File and click on Recover.
6.Go to the respective Folder Location to see the File restored\recovered
1.To start the process, open the windows registry as an administrator
2.Navigate to HKEY_LOCAL_MACHINE\SOFTWARE\SolidWorks\Applications\PDMWorks Enterprise\Databases[VAULT_NAME]
3.Right click the folder with the Vault Name and click export.
4.Enter a name for the Registry Backup and export it.
5.Now, Delete the following registry key folder for the respective vault view: HKEY_LOCAL_MACHINE\SOFTWARE\SolidWorks\Applications\PDMWorks Enterprise\Databases[VAULT_NAME]
6.Now, login into PDM Administration Tool and the respective vault as admin.
7.Right click the Vault name and choose ‘Create Local View’ option to create a fresh local view.
In order to use this utility, the File Card must contain the same variable as the Folder Card.
1.In the local vault view, check out the files to be updated.
2.Select the folder that contains the files to be updated.
3.From the Modify pull-down select Update > Values in File
4.Key Words can be entered to update only specific files. You can also choose to update files in sub-folders
5.Select in which work flow states the files to update should be in. means files that have not yet been checked in.
6.Deselect the files you do not want to update.
7.Select the variables that need to be updated.
8.Select which configurations of the files need to be updated.
9.Click on Finish to start the update.
10.Check-In all the checked out files and check for the values in the File Card.
1.Having a large number of files cached locally can impact performance when accessing files from the local vault view. On rare occasions some conflicts can arise with the locally cached files. Because of this, most locally cached files should be removed when they are no longer being used.
2.Remove a local copy at check in When a file is retrieved from the SOLIDWORKS Enterprise PDM file vault, a copy is placed in the working folder or local cache on the user’s local hard drive. The user should manage the cache accordingly and remove files from the local cache accordingly and remove files from the local cache area when they are no longer required.
3.Two of the methods for removing files from local cache are:
a.Clear Local Cache Command
Tools -> Clear Local Cache.
4.Clear Local Cache Command
From the navigation pane, right click a folder and select Clear Local Cache.
Tools -> Clear Local Cache
From the File view, select a folder and select Tools->Clear Local Cache.
1.There are two layers of document change history captured in SOLIDWORKS PDM: Version History and Revision History.
2.Both are important but they work in fundamentally different ways.
3.A new version of a document is added to its Version History every time the document is checked out, changed, and checked back in.
4.A ‘Revision’ is an instance of a document that has been released through the appropriate decision making process in your company.
5.Version History and Revision History work together to create a complete record of all changes made to a document – both changes to the document’s content and its meta data.
6.While Version History is maintained automatically by SOLIDWORKS PDM, Revision History is created by moving the file through the work flow according to review and approval process.